
Database management is a crucial task in today’s time, and to manage it, SQL becomes the first choice for everyone as it offers better features and functionality. Cursors in SQL play a very important role in handling query results as they allow users to work with each row of the result set and thereby take up individual rows for processing in more detail and on a finer level. The cursor in SQL serves as a filter between the statements that process a SQL query’s result and the result itself. After running the query, it allows you to work with the obtained data one row at a time. This concept applies especially to large data sets because bulk operations are not always possible.
In this article, we will learn about cursor in SQL, right from the basic concepts to the most advanced knowledge to work effectively with them. We will try to learn various types of cursors, their syntax, examples with explanations, error handling, and when and when not to use them.
What are Cursors in SQL?
In SQL, a cursor is a database object used to fetch, manipulate, and move through a result set row by row. They are treated as references to the result set derived from an SQL query. While most SQL operations are designed to act on the whole result set at once, set-based processing cursors enable the processing of one row at a time, row-by-row processing.
SQL cursors are an effective tool for dynamic queries that require row-by-row processing because they enable developers to perform more intricate data changes by retrieving one row at a time. But how does the cursor in SQL work?
When the database server executes Data Manipulation Language operations on a table, including INSERT, UPDATE, and DELETE, among others, it allocates a temporary memory called a cursor. It is employed to access and modify data kept in SQL tables.
Features of Cursor in SQL
- They provide a way to navigate a result set that was returned by a query.
- Cursors make it possible to work with individual rows, which is useful for applications that need to analyze data at the row level.
- With queries such as SELECT, UPDATE, or DELETE, cursors become the most viable option to use.

POSTGRADUATE PROGRAM IN
Multi Cloud Architecture & DevOps
Master cloud architecture, DevOps practices, and automation to build scalable, resilient systems.
Why Use Cursors?
In SQL, Cursors are necessary when we need to move through rows sequentially or when the logic we are implementing demands the handling of individual rows. It may include operations, such as updating records or computing aggregated values row-by-row, which cannot be achieved easily with set-based operations. Here are the reasons why cursors are used:
- Complex Row-by-Row Processing: When business logic requires processing each row one after another.
- Conditional Updates: To verify the requirements given before updating the data in each row, a cursor is employed.
- Row-Level Processing: When specific rows must be fetched and processed based on complex conditions.
- Managing Large Result Sets: Cursors assist in breaking up large datasets into smaller pieces so that the database server isn’t overloaded.
- Batch Processing: Cursors can be explicitly or implicitly used to support row-level operations where large data sets are involved.
Also Read: SQL View with Examples
Example:
Suppose, you want to process the salary of each employee based on specific conditions like applying raise based on department, etc., then that processing becomes impossible to do using a single query. A cursor would allow you to go through each employee and consider applying the raise as appropriate for that employee.
Cursor Life Cycle
Cursor in SQL has a life cycle, starting with their declaration and ending when they are closed and deallocated. Therefore, understanding the life cycle of the cursor in SQL is important to write error-free SQL queries.
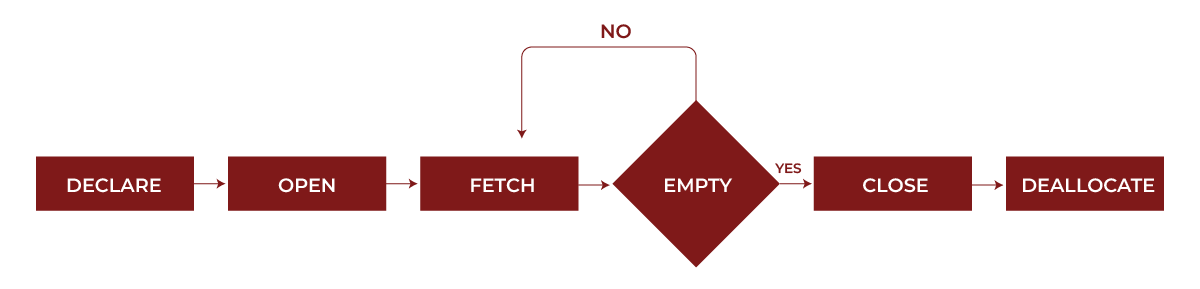
The above picture shows the life cycle of a cursor in SQL, starting from its declaration to its deallocation. We will now see each step in detail:
- Declare Cursor- In this step, the memory is allocated, and define the query associated with the cursor.
Syntax:
DECLARE cursor_name CURSOR

FOR select_statement;
2. Open Cursor- In this step, we execute the query and load the result set into memory.
Syntax:
OPEN cursor_name;
3. Fetch Cursor- It refers to retrieving one row from the cursor at a time.
Syntax:
FETCH NEXT FROM cursor INTO variable_list;
4. Process Cursor- It means to apply the required processing logic to the fetched row. This can be your custom logic to process the cursor.
5. Close Cursor- It means to release the result set and free the memory.
Syntax:
CLOSE cursor_name;
6. Deallocate Cursor- Here, we remove the cursor definition and release any system resources associated with it.
Syntax:
DEALLOCATE cursor_name;
Example:
-- 1. Declare Cursor

DECLARE cursor_name CURSOR FOR

SELECT employee_id, employee_name FROM Employees;


-- 2. Open Cursor

OPEN cursor_name;


-- 3. Fetch Data

FETCH NEXT FROM cursor_name INTO @employee_id, @employee_name;


-- 4. Process Data

-- (Apply business logic here)


-- 5. Close Cursor

CLOSE cursor_name;


-- 6. Deallocate Cursor

DEALLOCATE cursor_name;
This example demonstrates the complete usage of a cursor life cycle in SQL.
Types of Cursors in SQL
In SQL, there are generally two types of cursors used, i.e., implicit and explicit cursors. Both types differ in how they are declared and managed in SQL.
Implicit Cursors
Implicit cursors in SQL are automatically created when a DML (Data Manipulation Language) statement select, insert, delete, or an update is used. Such cursors are neither defined nor voted for. The DBMS takes care of the entire cursor lifecycle processes automatically. They’re also known as Default Cursors of SQL SERVER.
SQL Example:
-- Example: Implicit Cursor with SELECT INTO

DECLARE @emp_id INT;

DECLARE @emp_name NVARCHAR(130);


-- Implicit cursor is created only after this statement is executed

SELECT @emp_id = EmployeeID, @emp_name = Name

FROM Employees

WHERE EmployeeID = 2;


-- Values of EmployeeID and Name are implicitly fetched

PRINT 'The Employee ID: ' + CAST(@emp_id AS NVARCHAR(10));

PRINT 'The Employee Name: ' + @emp_name;
In this query, SQL automatically creates and handles the cursor for the SELECT INTO statement to retrieve a single row.
Explicit Cursors
Explicit cursors in SQL are created and controlled by the user. Their main purpose is managing complex queries that require row-wise actions. With explicit cursors, you control the cursor life cycle by manually opening, fetching, closing, and deallocating the cursor.
In explicit cursors, there are different methods to access data from the cursor when using the PL/SQL, and they include:
- FETCH FIRST: Fetches the first row from the cursor. This method is often used to initialize the cursor or to reset the position to the start.
- FETCH LAST: Fetches the last row of the cursor. This method is useful for obtaining the final record in a dataset.
- FETCH NEXT: Fetches the next row from the cursor. This fetch method, which lets you go through each row sequentially, is the most popular one.
- PRIOR: Fetches the previous row in the cursor result set. This fetch method, which lets you go through each row sequentially, is the most popular one.
- ABSOLUTE n: Fetches a specific row number in the result set.
- RELATIVE n: Fetches a row relative to the current position.
SQL Example:
-- Declaring a cursor

DECLARE emp_cursor CURSOR FOR

SELECT EmployeeID, Name FROM Employees WHERE DepartmentID = 5;


-- Declaring variables to store cursor results

DECLARE @emp_id INT, @emp_name NVARCHAR(100);


-- Open the cursor

OPEN emp_cursor;


-- Fetch data from the employee cursor

FETCH NEXT FROM employee_cursor INTO @emp_id, @emp_name;


-- Loop through the result set

WHILE @@FETCH_STATUS = 0

BEGIN

PRINT 'The Employee ID: ' + CAST(@emp_id AS NVARCHAR(10));

PRINT 'The Employee Name: ' + @emp_name;


-- Fetch next row

FETCH NEXT FROM emp_cursor INTO @emp_id, @emp_name;

END;


-- Close the cursor

CLOSE emp_cursor;


-- Deallocate the cursor

DEALLOCATE emp_cursor;
In this query, the user creates and handles the cursor manually to retrieve and process the rows. This is useful when the programmer needs more control over the query execution and efficient working of the database.

82.9%
of professionals don't believe their degree can help them get ahead at work.
Types of Cursors in SQL Server
While SQL has implicit and explicit cursors in general, the SQL server also has different types of cursors, and these include static, dynamic, forward-only, and keyset cursors. We will now all of them in detail:
Static Cursors
A static cursor snapshots the result set when created. Once opened, any subsequent changes in the underlying data (INSERT, UPDATE, DELETE) are hidden from the cursor (means read-only). This means the result shown by the static cursor is always the same as when the cursor was opened for the first time.
They are useful for situations where you do not want to see changes on scroll movement thus great for reporting purposes. Static cursors are slower than forward-only cursors but are faster than dynamic cursors as they do not have to look for changes in real-time.
Dynamic Cursors
A dynamic cursor shows changes in the result set rows made while the cursor is still open. This means any operation, such as insertion, update, etc., can be performed while the cursor is open. So if, for example, a row is updated or deleted while the cursor is open these changes are visible to the cursor.
They are useful in situations when you have to see the changes in data and make decisions. These are the most resource-demanding cursors since they have to be in constant communication with the underlying data.
Forward-Only Cursors
A forward-only cursor allows you to move through the result set from the first row to the last, i.e., moving only in the forward direction. There are no provisions for scrolling backward or revisiting previous rows. This can be useful in scenarios where you only need to sequentially process the data, for example, when generating reports. They are the fastest cursors and use fewer resources because the full result set does not need to be retained.
The Forward-Only cursors are of three types:
- Forward_Only Keyset
- Forward_Only Static
- Fast_Forward
Keyset Cursors
Keyset cursors are different from all other cursors as they can move from first to last and last to first row. The primary key values of the rows in the result set are stored by a keyset cursor. The primary keys are retrieved when the cursor is opened, and any modifications (adjustments or deletions) made to these rows during the cursor’s open state are reflected. New rows that were added after the cursor was opened, though, are hidden.
Keyset cursors are useful for viewing updates to rows that are already there, without being concerned about new rows that are introduced after the cursor is opened. It is faster than dynamic cursors but slower than forward-only and static cursors.
Cursor Attributes
- %FOUND: Returns TRUE if the last fetch returned a row; otherwise, returns FALSE.
- %NOTFOUND: Returns TRUE if the last fetch did not return a row.
- %ROWCOUNT: Returns the number of rows fetched so far.
- %ISOPEN: Returns TRUE if the cursor is open, or else returns FALSE.
We will now these attributes working in PL/SQL, with the help of an example that uses an explicit cursor.
Note: Make sure to have a table in SQL named employees with some basic information such as emp_id, name, etc.
Example:
DECLARE

CURSOR emp_cursor IS

SELECT emp_id, emp_name FROM employees WHERE dept_id = 102;

v_employee_id employees.emp_id%TYPE;

v_employee_name employees.emp_name%TYPE;

BEGIN

-- Check if the cursor is open before fetching (should be FALSE here)

IF emp_cursor%ISOPEN THEN

DBMS_OUTPUT.PUT_LINE('Cursor is already open.');

ELSE

DBMS_OUTPUT.PUT_LINE('Cursor is closed. Opening cursor now...');

END IF;

-- Open the cursor

OPEN emp_cursor;

-- After opening, check if the cursor is open

IF emp_cursor%ISOPEN THEN

DBMS_OUTPUT.PUT_LINE('Cursor is now open.');

END IF;

-- Fetch the first row and check the cursor attributes

FETCH emp_cursor INTO v_employee_id, v_employee_name;

IF emp_cursor%FOUND THEN

DBMS_OUTPUT.PUT_LINE('First row found:');

DBMS_OUTPUT.PUT_LINE('The Employee ID is: ' || v_employee_id || ', and name is: ' || v_employee_name);

ELSE

DBMS_OUTPUT.PUT_LINE('No rows found.');

END IF;

-- fetch all rows using a loop

LOOP

FETCH emp_cursor INTO v_employee_id, v_employee_name;

-- Use %NOTFOUND to exit the loop when no more rows are found

EXIT WHEN emp_cursor%NOTFOUND;

-- Output the fetched row and current row count

DBMS_OUTPUT.PUT_LINE('The Employee ID is: ' || v_employee_id || ', and name is: ' || v_employee_name);

DBMS_OUTPUT.PUT_LINE('Row Count: ' || emp_cursor%ROWCOUNT);

END LOOP;

-- Close the cursor

CLOSE emp_cursor;

-- Check if the cursor is closed

IF NOT emp_cursor%ISOPEN THEN

DBMS_OUTPUT.PUT_LINE('Cursor is now closed.');

END IF;

END;
In this example, we have used all 4 attributes in PL/SQL that demonstrate different functions such as:
- %ISOPEN verifies that the cursor is open before, during, and following its opening and closing.
- %FOUND verifies whether the row was successfully fetched following the FETCH instruction.
- %NOTFOUND decides whether to end the loop; it determines if the previous fetch operation succeeded in retrieving all of the rows.
- %ROWCOUNT keeps track of how many rows have been retrieved.
Example of Working with Cursors
Now that we have understood the basic details about cursors, such as their types, key attributes, etc., we are ready to take some examples to understand them more.
The given below is a simple example that processes in a row-wise manner. We will be using the same `employees` table for this example also, so make sure you already have the same in your local space.
Example: Increment the salary of each employee by 2500 within a specific department.
DECLARE emp_cursor CURSOR FOR

SELECT emp_id, salary FROM Employees WHERE dept_id = 101;

OPEN emp_cursor;

FETCH NEXT FROM emp_cursor INTO @emp_id, @salary;

WHILE @@FETCH_STATUS = 0

BEGIN

-- Increase salary by 2500

UPDATE Employees

SET salary = salary + 2500

WHERE emp_id = @emp_id;

FETCH NEXT FROM emp_cursor INTO @emp_id, @salary;

END

CLOSE emp_cursor;

DEALLOCATE emp_cursor;
Error Handling in SQL Cursors
When using cursors, error handling is essential because mishandling can result in resource leaks and inaccurate results. SQL provides different mechanisms for error handling in SQL server and PL/SQL. We will understand both of them in detail with examples:
Error Handling in SQL Server
Error handling in the SQL server includes the usage of TRY-CATCH statements in the block of code. Let’s understand this with the help of an example:
SQL:
BEGIN TRY

DECLARE emp_cursor CURSOR FOR

SELECT emp_id, salary FROM Employees;

OPEN emp_cursor;

FETCH NEXT FROM emp_cursor INTO @emp_id, @salary;

-- Process the rows

END TRY

BEGIN CATCH

-- Handling the error

PRINT 'An error occurred.';

END CATCH;

CLOSE emp_cursor;

DEALLOCATE emp_cursor;
Explanation:
In this example, we performed several operations to handle errors in the SQL:
- BEGIN TRY / END TRY: This block contains the code that may cause an error. If any error occurs within this block, control is passed to the corresponding CATCH block.
- DECLARE emp_cursor: In this statement, a cursor named emp_cursor is declared to select emp_id and salary from the Employees table.
- OPEN emp_cursor: Using this command, the cursor is opened, ready to retrieve rows from the result set.
- FETCH NEXT FROM emp_cursor: This statement tries to place the next row from the cursor into specified variables (@emp_id, @salary). In such cases, if the fetch operation fails – like when the cursor is not properly opened, then the control will move to the CATCH block.
- BEGIN CATCH / END CATCH: In case of an error occurring in the TRY block, the control flow comes here. At this step, it merely displays an error message.
- CLOSE and DEALLOCATE: It is important to note that regardless of whether an error occurred or not, the cursor should be closed and deallocated, resources need to be free.
Error Handling in Oracle (PL/SQL)
Error handling in Oracle’s PL/SQL includes the usage of an EXCEPTION block in the PL/SQL code. Let’s understand this with the help of an example:
SQL:
BEGIN

OPEN emp_cursor;

FETCH emp_cursor INTO emp_id, salary;

EXCEPTION

WHEN NO_DATA_FOUND THEN

-- Handle no data found

WHEN OTHERS THEN

-- Handle any other exceptions

END;
Explanation:
In this example, we have performed several operations to handle errors using PL/SQL:
- BEGIN / END: This block contains the code to execute. If any error occurs, control will transfer to the EXCEPTION block.
- OPEN emp_cursor: The data-fetching cursor is opened by this command.
- FETCH employee_cursor INTO employee_id, salary: This line fetches the next row from the cursor into the specified variables. If there are no more rows to fetch, it raises the NO_DATA_FOUND exception.
- EXCEPTION: This block is executed if an error occurs in the BEGIN block.
- WHEN NO_DATA_FOUND THEN: This particular handler handles the situation that no more rows are remaining to be fetched.
- WHEN OTHERS THEN: At this point, this handler includes all other exceptions that are not specifically connected with the above examples.
Also Read: CRUD Operations in SQL
Pros and Cons of Using Cursors
Pros of using Cursors
- Row-by-Row Processing: Cursors are useful in situations where relationship manipulation is performed at the gross level. One at a time relationships are modelled when it is known that particular logic will most certainly be needed for each individual entity or when it is necessary to serve context-preserving relationships.
- Flexibility: Cursors have this functionality that allows jumping to different places in a result set (forward and backward), allowing the user to perform richer data and control flows.
- Complex Business Logic: When a task contains complex calculations or several sequential processes that can hardly be encapsulated within an SQL query, cursors provide a solution within the encapsulated processes. Such processes may include rules-based data ‘rollups’ or simply looping through a dataset with some business logic embedded in the various loops.
- Multiple Operations on the Same Data: Cursors allow multiple activations of similar data repositories without necessary re-invocation of queries. This may come in handy in situations where the same information is worked on in many ways.
- Dynamic SQL: Cursors stand in the line where they can be used with dynamic SQL allowing the running of SQL statements written on the fly as dictated by necessary conditions or user interaction.
Cons of using Cursors
- Performance Issues: Cursor operations have a much lower rate of performance compared with set-biased operations particularly when the operation involves large data sets. Such implies latency as every of such data cells is completed fetched and worked on independently.
- Resource-Intensive: Compared to set-based activities, cursors can lock resources for longer periods and use more memory and network resources. This may result in contention problems and have an impact on the database’s overall performance, especially when there are high loads.
- Complexity: Cursor-based code can be more difficult to maintain and more complex. Bugs may result from this complexity, particularly if error handling is not sufficiently taken care of.
- Optimization Issues: Compared to set-based operations, which frequently make better use of database indexing and execution plans, the performance of cursor-based operations can be more difficult to improve.
- Possibility of Resource Leaks: Improper closing and deallocation of cursors might result in resource leaks, which can affect database performance. Therefore, cursor lifecycle management must be done carefully.
Best Practices for Working with Cursors
- Use Cursors Sparingly: Cursors should be avoided except in cases when they are extremely required. Operations that are set based on SQL are in most instances, faster and more efficient.
- Use READ_ONLY Cursors: Where the cursor is not supposed to make any updates, state the cursor as READ_ONLY to make the performance better.
- Close and Deallocate Cursors: It is important at all times to ensure that cursors are closed and de-allocated to avoid memory, etc.
- Consider Alternatives: When using a cursor first check if there are other performing SQL commands as alternatives to cursors that could do the same task quicker.
Conclusion
Cursors in SQL are a powerful feature for handling row-by-row processing of query results. Cursors are specifically designed to implement the mechanisms of sequential-step processing of the query result data. They do attach a performance cost though, and are effective only when used in specific circumstances so the programmer should plan appropriately.
In this comprehensive guide, we have covered every topic related to the cursor in SQL including the life cycle of cursors, why they are used and important, types of cursors in SQL as well as SQL server, and different attributes. Moreover, we have seen multiple examples of implementing cursors in SQL, understood why error handling is important and how they’re handled, along with the pros & cons and best practices of working with cursors. Want to explore DBMS in detail? Try the Accelerator Program in Business Analytics and Data Science offered by Hero Vired in collaboration with edX and Harvard University.
What is a cursor in SQL?
How can cursors be avoided?
What is a user-defined function in SQL Cursor?
Can we use Joins with SQL cursors?
What is the meaning of cursor and trigger?
Updated on December 13, 2024